December 17, 2012

Patterned Paper Please

Happy Holidays everyone!  Life is good - I am officially on vacation now and won't return until 1/1/2013!  That still seems a little odd to write....2013!  Seems like just yesterday we were all freaked out about going from 1999 to 2000 - how many checks did you mess up that year?  I always have a problem going from year to year when writing out checks....then you throw in changing from 1999 to 2000 - all I can say now is thank goodness for online banking/payments!!!!!!

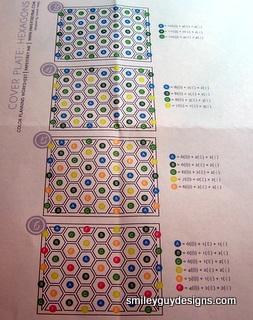
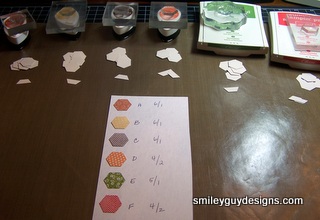
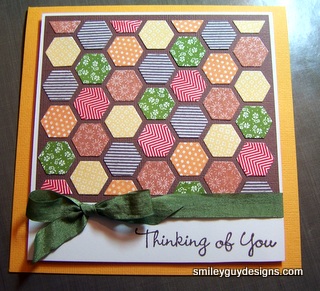
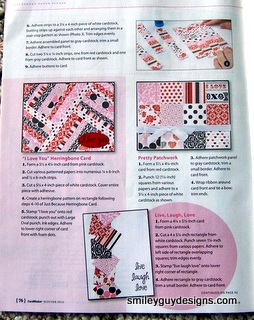
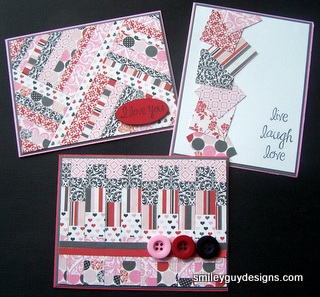
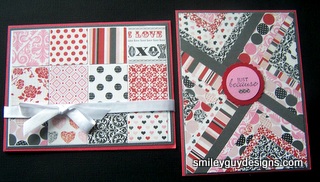
I have to share with everyone the latest issue of CardMaker Magazine (Winter 2012).  I have a set of cards in this issue under the category using patterned paper.  I was driving home from work one day thinking about what type of card I wanted to do to submit as a project and then I thought....why do just one?  I had this idea to showcase a number of cards you can do using the same patterned paper.  I used the Echo Park 'Yours Truly' 6x6 paper pad.  I had just learned how to do a couple of new techniques and was excited to share!  So I did a 'bargello' and a couple of different 'herringbone' patterns along with a quilt card.

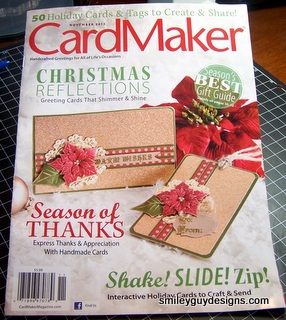
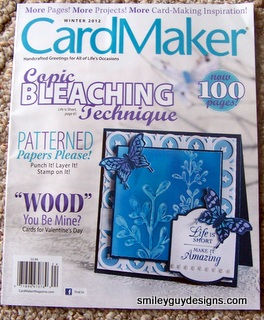
Here is the Winter 2012 cover of CardMaker Magazine in case you want to check it out at your local bookstore in person.

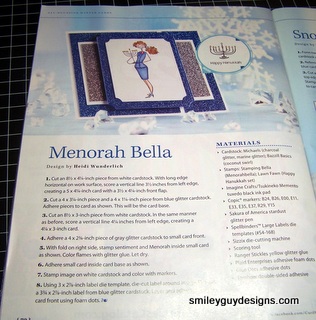
I'm excited to share that I have a four pages in this particular issue.  The editor asked that I send extra paper so they could do 'step outs' photos along the way. 

Here are close ups of the actual cards.  The card in the upper left corner of first photo and right side of bottom photo are the herringbone patterns and the bottom one in the first photo is the bargello pattern. 


I wish everyone a happy and safe holiday season.  Please keep the families from Newtown, CT in your prayers as they try to get through what should be a happy season and is instead a painful reminder that life is short and can be changed in the blink of an eye. 
 
Thank you for stopping by and hope to see you again soon.
Heidi


December 2, 2012

I Pine for You

Happy Sunday everyone!  Today in the midwest was a wonderful day....it was pretty warm for this time of year - I think we were in the low to mid 60's.  I was able to open up the sliding glass door and get some fresh air in my apartment.

The deadline for the Lawn Fawn CHA challenge contest is tomorrow, 12/3 at 10pm EST.  While at my scrapbooking Christmas party yesterday I stamped a bunch of images from my friend Valerie's 'Critters in the Forest' stamp set.  Today I worked on my last entry for the Lawn Fawn challenge.  Here's what I came up with.....


I made the tree images into Christmas trees by drawing in a string of bulbs and coloring each one with a COPIC marker and then using matching stickles to give them some bling!

Nothing else to report since my post from yesterday.  I hope you enjoyed my entries for the contest.  I'll keep you posted on the outcome.  Wish me luck!!!! 

Thanks for stopping by - hope to see you again soon!

December 1, 2012

Make a Wish - Lawn Fawn CHA Contest

Here's my second post today.....it's called 'Make a wish' and isn't that a perfect sentiment for entering a contest??!!

Using the same 'Critters Ever After' stamp set I created this cute little dragon!!


The die cut is an inverted scallop - doesn't it look cool?  Then I mirrored it in the corners by using one of my We R Memory Keepers Corner Chomper. 

Today I went to a Christmas scrapbooking holiday party at my friend Debbie's house.  It was so much fun, I really hated to leave.  I wish I could have stayed until the end but I needed to get home and take care of my Mom.  It was wonderful to get out of the house for a few hours.  My friend, Val, was there and she's been entering the Lawn Fawn contest too....and she had one of her critter sets with her so I was able to stamp some images using her set....I have to come up with a design using them and I need to do it by Monday, 12/3....that's the deadline for the contest.  Wish me luck!!!

Thanks for stopping by...see you again soon,

Heidi

Another Lawn Fawn Entry for CHA Contest

Hi everyone!!!  I've been wracking my brain trying to come up with another design for an entry into the Lawn Fawn CHA contest.  And it's funny how inspiration can strike anywhere.  I was in a meeting for work that was held in the Crystal Ballroom at the Hilton in Milwaukee, WI.  I happened to look up and on the ceiling was an interesting pattern,  I took a picture of it with my cell phone.


I have the Lawn Fawn critter set called 'Critters Ever After' and one of the images in this set is a wand.  I thought the wand would be cool to use as the little spikey things separating the round disks.
So once I got home I sat down and went to work.  Here's what I came up with......


Check out my next post too...I have yet another card for the contest. 

Thanks for stopping by...see you again soon!

Heidi


November 29, 2012

Naughty or Nice??

I can't believe it's almost December.  And we all know Christmas will be here before we know it.  At least now when I see Christmas decorations in stores, in neighborhoods or hear Christmas music I don't feel like slamming my hand in the car door!  When they start all of this the day after Halloween it's makes me want to run with scissors!!!!!!!!

I have this stamp set called Santa Stationary which includes stamps to create the following Santa's Official Nice List Declaration.  I made a few of these for some people at work and thought it's perfect timing to post on my blog since Christmas is just around the corner.


Each section of the declaration is a separate stamp image - I especially love the line under the Santa Claus signature which states 'Checked twice and signed by'   There's a blank line in the center where I can add a name using a small clear alphabet set (clear stamps just line up so nicely).  Here's an example of one with my niece's name on it.


There are also stamp images that you can use on the actual envelope.


 One of my friends at work said she was going to put the cards in her mailbox because her kids always go with her to pick up the mail.  She'll open the mailbox and look surprised when she hands the cards to her kids...she says they will be soooooooo excited! 

If you're interested in getting a Nice List Declaration for your child(ren) send me an email (smileyguydesigns@gmail.com) and we can work out something.

Thanks for stopping by and hope to see you again soon!

Heidi

November 24, 2012

Thank You

Okay...guess what I just learned?  When entering contests...if you post two projects on one post, you can only enter one of the pictures....DRATS!  So, I have to create a separate post for my second card in order to enter that one....good to know!

Lawn Fawn entry #2 - using 'Quinn's' alphabet stamp set, COPIC markers and twine.


Thanks,
Heidi

A Lawn Fawn Contest

Hi there friends!  I hope everyone had an enjoyable Thanksgiving and didn't overeat tooooo much turkey and other goodies.  I just finished another dinner of turkey leftovers and I must admit - a burger and fries sounds really good for dinner tomorrow night!   I'm not a big cook but I make a mean Thanksgiving meal - I cook a Butterball turkey breast (afterall it is just me and Mom), stuffing, a couple of sides and some cranberrry sauce....luckily from start to finish it only takes about 3 hours - so I get to enjoy most of my day and have a good meal!

There is a stamp company called Lawn Fawn which has some really great stamp sets - I just love their whimsical images.  Well, they have a contest going on right now where one winner from three different categories will have their cards displayed at their booth during the January 2013 CHA (Craft and Hobby Association) convention as well as their upcoming catalog.  Below are two cards I'm entering in the 'alphabet' category.  Hopefully I'll be able to do a couple of more projects before the 12/3 deadline.

The rules are really simple - only use specific stamp sets determined by Lawn Fawn, no patterned paper, but you can use any ribbon, buttons, etc. you want.

The first card is made using the 'Smitty's' alphabet set along with a scalloped EK Success punch and some Craftwork Candi dots.


The second card is made using the 'Quinn's' alphabet stamp set, some COPIC marker coloring and twine.


I'm sure there will be tons of great cards submitted for this contest - so, wish me luck! 
Thanks for stopping by.  Hope to see you again soon.

Heidi

November 11, 2012

Thanks for Being A Friend

Hi everyone...it's been a couple of weeks since my last post and I have a good reason.  The reason  is that I've been spending WAY too much time on Facebook.  I have fought signing up for a FB account for several years.  All my friends kept asking me when I was going to give in?  I really had no desire to get involved.  Well, about a month ago, in a moment of weakness, I decided I would do it!   I am really enjoying it and yes, I rush home from work to log in and see what all my 'friends' are up to.  Within like 10 minutes after creating my account I 'friended' the roommate I hadn't talked to in many, many years and it was so great to get back in touch with her.  I worked for Prudential Insurance way back in the day and left there in 1996....I have gotten back in touch with so many of my friends from back then and it's been really good....Facebook is so COOL!

Let's see....what other news do I have...oh yeah!  After some soul searching I decided to leave my part time job at Archivers after 5 years.....I know....5 years is a LONG time for a part time job.  But since my Mother came to live with me 14 months ago, working full time, part time and taking care of her has just gotten overwhelming.  Megan, the manager at Archivers, was wonderful in only scheduling me to work one day a week, but even with that I felt it was just time to take a break.  And because I will really miss all the girls at the store, I decided to make them all cards to say goodbye and thank them for being my friend.

I took a background stamp and then stamped a butterfly over that and colored it in with COPIC markers.  I made 12 cards and was able to come up with 12 different color combinations so everyone got a different colored butterfly. 
 
For those of you that have a little OCD will see that I have 13 colored images above....I made an extra one for me to keep - and of course to pick out the 12 BEST colored ones for my friends.

Then I was at Michaels and found a container of flowers and all the colors of flowers matched the butterflies so of course, I had to buy them.

I decided to put the stamped image on a black card.  I then took a white Signo pen and drew a dotted line all aournd the edge of the card to personalize it with their name.

I didn't take a picture of the inside of the card but the stamped sentiment from Stampendous says:
                    "Thank you for walking beside me and being my friend"

I follow the blog DarleneDesign.com and this is a link to the video she posted with this technique.

DarleneDesign.com

Thanks for stopping by.  I hope to see you again soon! 

Heidi


October 25, 2012

My Friend Valerie ROCKS!

My friend Valerie is taking the internet by storm.  On her blog, ValByDesign, she posts many different types of things.  She shares cards she's made, various videos she sees on the internet (i.e scrapbook organization and card making techniques, etc.) and her scrapbook pages for Project Life.

I met Valerie while working at my part-time job at Archivers.  Some of my readers may remember my post showing the Thank You card I made for her Special Thank You for Friend.  She is such a friendly, happy and talented crafter.  She has four kids and each year creates an album for EACH kid - now that's LOTS of scrapbooking.  I have no idea how she finds time to do any kind of crafting - but where there's a will there's a way and she definitely has the will going.

Valerie did a recent post on her blog to show some mini Thank You cards she made using Core'dinations cardstock.  This cardstock is a wonderful item for crafters since it's a colored core cardstock that can be sanded to expose the color underneath.  Crafters just love it!  The people at Core'dinations saw Val's blog and posted it on their Facebook page.  They also tweeted about it on Twitter.   Valerie's blog post   


Now while this is FABULOUS in and of itself...by the time I'm finishing up this post, Valerie has MORE good news.  The people at Cricut (personal electronic die cut machine) sent a message to Valerie asking her to post her projects on their Cricut.com Project Center page.   The card below was made using the Cricut die cutting machine and the Spongebob SquarePants cartridge to cut out the images.   Isn't it just adorable?  No wonder Cricut wants Valerie to post her projects on their site.


I told you Valerie ROCKS.  Keep up the good work  - I'm so proud of you!!!

Thanks for stopping by and see you again soon!
Heidi

October 15, 2012

Guess Who's In CardMaker Magazine

Hello my friends!  Bet you're surprised to hear from me again so soon but I had to share this with everyone.  I'm pretty stoked!!!!

I just received the November, 2012 issue of CardMaker magazine and... wait for it....wait for it.....if you turn to page 72 guess what you'll see....a card by yours truly.  It's a Hanukkah card using a stamped image from Stampin Bella called 'Menorah Bella'.  

As some of you may know, I teach card classes part time at Archiver's (a local scrapbooking store). This past weekend, I was teaching a class and one of the ladies told me she had gotten her magazine and recognized my name.  It was rather exciting to have someone see my card without me showing it to them. 

Here's a close up of the image used on the front of the card.  She's colored with COPIC markers. (E00, E11, B24, B26, Y15, R29, E33, E35, E37).  The glitter cardstock is from Michael's and it's the greatest - all the sparkle and none of the glittery mess (anyone who works with glitter knows that all you have to do is look at it and it's stuck to your face, in your hair, etc.).


Here's a picture of the card along with the instructions and materials list.  I just love how they always set the stage to make each card look fabulous!

 
Here's a copy of the front of the magazine so that if you want to go to your local scrapbook store you know what to look for.
 
 
There's a funny story about this card.  My original card had a different focal point - it was a Star of David and had the word 'Shalom' inside.

 
When the editor told me they had picked the card for publication she asked if I could change the focal point to remove the word 'Shalom'.  Since they had picked the card I said 'sure, why not'.  But I didn't have anything small enough to fit in the middle so I did a paper piecing technique and strategically covered the word.  I sent it in and the editor loved it.  Then a few weeks later I received yet another email advising that particular stamp was being discontinued from Stampin Up so they couldn't use it.  She asked if I could do another focal point.  That's the point when I frantically searched my stamp stash and found my lovely Menorah Bella.  

 
I made the new focal point and sent it in.  So, by the time the magazine actually came out I had no idea what the card would look like.  I must say I think it turned out well...phew!!!!
 
Thanks for checking and hope to see you again soon!
Heidi
 

October 13, 2012

Hallo 'WASHI' ween!!!

Happy Saturday y'all!!  Is everyone enjoying this fall weather?  In the midwest it's definitely fall.  The weather is crisp and leaves are changing into the most beautiful reds, oranges and yellows!  Pretty soon though the trees will just be 'nekked'!  Even though fall is my fav time of year - I'm so glad I live in an apartment and do NOT, repeat NOT, have to rake said beautiful leaves.

I have to show you guys this picture....I took my Mom to the clinic/hospital on Sunday to have an MRI done...when I pulled into the parking lot there were NO cars in the parking lot near me.  We were in there about an hour and when I came out look what I found next to me???  Seriously?  There was NO other place for them to park?  I have my Mom in a transport wheelchair and she gets in on the passenger side.  Gee, I hope I didn't put any dings in their door!!!


Now on to some Halloween stuff.  I made some tags for my co-workers at Assurant Health.  I used a bunch of different washi tapes.  If you don't know what washi tape is it's really cool.  It's a very thin tape that comes on a roll like scotch tape or masking tape.  It's really thin and can be torn or cut off the roll.  They're repositional so if you don't put it down in the right spot you can pick it up and move it.  Some of them are a little transparent so if you put one over another you may be able to see the pattern underneath.  It's really fun and seems to be the big trend for the season.


I just unrolled a bunch of the tape and cut the edges.  I wrapped the tape around the back of the white piece of paper. On some of them I punched out a 1" circle and then a 1.5" circle out of pattermed paper and glued it on the back.  I punched and adhered the black spider to the front.  Then I realized that was a bunch of extra work.  So then I decided to just punch a 1" circle of patterned paper and adhere it directly to the front and then adhered the spider.   Cut out two steps and it all looks the same.  Sometimes I get tunnel vision and have to do things the hard way....then a light bulb goes off and it's DUH....I coulda done it differently. 


Here's a picture of the washi tapes rolls I used.  Most of them are from Queen & Co.  The orange one that has the words on it is from another company but I can't remember which one...sorry!
That's all for today.  Thanks for stopping by and hope to see you again soon!

Heidi

September 19, 2012

A Sketchbook Project

Hi everyone - I wanted to share something I found on a video (I know...me watching a crafty video - whoda thunk?).  I was watching a video on KWernedesign.com under her video section 'Make a Card Monday' on making card sketchbooks.  I thought this was a cool idea.  See her post here.... 

http://www.kwernerdesign.com/blog/?p=8149

Here's a picture of the finished card sketchbook.  The cardstock is from an old Tim Holtz paper pad and the letters are from a QuicKutz alphabet die set called Star Dust.

On Kristina's website she has a pdf file of a blank page showing outlines of cards in both vertical and horizontal formats.  When you print them out, print them double sided so you'll be able to have more blank cards on fewer pages.  I used 5 sheets so it's 10 pages. You don't want to make it too thick.


She also has a pdf for blank scrapbook pages but I printed some out and used them for 6x6 square card formats.


The sheets have a dotted line to cut, so cut along the line and then fold each sheet in half.  I believe the size of the book ends up being 3.75 x 8.50.  The cover of the sketchbook should be cut 7.50 x 8.50, also folded in half.  Line up all your inside pages with the cover and then staple in the center.  (Tip: open up your stapler and staple into a mouse pad or a chair cushion - this will keep the prongs of the staple open so that you can manually fold them over).  Decorate the cover and viola, your book is done.  If the pages at the bottom of the sketchbook don't line up because of the number of folded papers inside the book, take a ruler and an exacto knife and just trim them evenly.

Here's an example of what the inside will look like....


When I see a sketch I like on a blog I just draw it out...if I think of a layout myself, I'll draw it out.  It's really handy and such a cool idea.....wish I'd thought of it first. 

Hope you enjoy this project.  Thanks for stopping by - see you next time.

Heidi

September 7, 2012

Happy Little Hexagons

Happy September everyone!  I know we're still having some warmer days but I also know Fall is just around the corner.  I can't wait until the leaves start changing color - I need to put a camera in my car so that as I'm driving around and happen upon those wonderful reds, oranges and yellows I can capture the moment.

Last month I happened to run across some things at PaperTrey Ink and I fell in love with them....so of course I had to order all of them...well, maybe not ALL of them...but a good portion of them.  I also happened to catch a youtube video on my favorite so I decided to do a tutorial to show y'all.  It's a bit lengthy and has lots of pictures!

The stamp set is called Happy Hexagons Mini Stamp and there is a matching die cut called Cover Plate: Hexagons.  The first thing to do is die cut the cover plate.  The cover plate template is about the size of an A2 card (5.5 x 4.25). Then you poke out the little hexagon pieces...there are full, half and quarter pieces. 


What you're left with is a template. As I poked out the pieces I put them in separate piles so that I didn't have to sort them later.  For my project I won't be using the quarter pieces.


Nicole Heady is the designer of the stamp set and cover plate.  She has also created this color template which is FABULOUS.  She has taken all the headache out of trying to put all the pieces back in the template without having too many of the same pieces side by side.  She has the color templates for using 3, 4, 5 or 6 colors.  The sheet also shows how many of each color is needed.  This is a free download from her website.


I decided to use 6 colors, so I picked 6 different hexagon stamp patterns and 6 different ink colors.  I labeled each color and pattern as A, B, C......F. The numbers by each color represent how many full hexagons and how many half hexagons are needed for each color.  (for example A, I need 6 full and 1 half).


I then counted out all the pieces I needed and put them with the stamps and inks.  Time to start stamping.


When all the pieces are stamped, it's time to take the template and begin building your pattern.  I used scotch tape to keep the template in place.  It's easier to put adhesive through the openings of the template than trying to put it on each hexagon piece.  Following the chart, put all of the A pieces in the A spots, B pieces in the B spots and so on until the entire piece is complete.


When you're done, you lift the template off and you're left with a beautiful pattern.  You don't have to fill in the entire template, you can just do a couple of rows for a border, or maybe create a flower, you can even cut apart some of the inside pieces to make room for a sentiment.  When you're done use the piece to make a card.


Check out all the fabulous things PaperTrey Ink has - last month was their Autumn release and they have some really cool looking stamp sets and matching die cuts. 

Thanks for visiting - see you next time.

Heidi

August 19, 2012

Triple Time Stamping

Happy Sunday everyone.  Hope all is well with you wherever you happen to be.  Things in the midwest are great!  The weather has been nice and comfortable - I think (at least I hope) we're done with the unseasonably warm 100 degree days.  Fall is my favorite season and I'l looking forward to it.

I recently saw a youtube video on something called Triple Time stamping (see http://dostamping.typepad.com).  It has such an elegant look and is quite easy to do.  I've got some pictures to walk you through the technique.use

The supplies I used are:
White cardstock for stamping
Black cardstocl for matting
Lace Doilies cling stamp from Inkadinkado
Classic ink in Tempting Turquoise from Stampin' Up
Charcoal twine from the Twinery
Be Happy Sentiment stamp set from AmyR Stamps


Cut three pieces of white cardstock in the following measurements:  2 x 3.25,  3 x 4.25 and 4 x 5.25.
Cut three pieces of black cardstock for matting:   2.25 x 3.50,   3.25 x 4.50 and card base 8.50 x 5.50 (folded into 8.25 x 5.50 A2 card base)


Using a TINY bit of repositional tape (or permanent tape and using your finger try to rub some of the sticky stuff off the back).  You want the layers to stick together but not too well.  Stack all three layers as shown above.


Ink up your image and stamp it all the way around the card making sure that some of the images span 1, 2 and all 3 layers.  You'll see a gap between some of the layers and that's okay, because once we mat each layer it will look just fine.


Separate the layers and mat each section with the black cardstock.  Make sure that when you put all the pieces back together that they flow in the right direction...all the flowers should appear seamless.


Once all layers are matted, adhere the smallest layer to the second layer, stamp your sentiment and wrap some twine around it and tie into a bow.  Attach that layer to the card base layer and you are done.

It's a very easy card to make and I just LOVE the look of it.  You can do this in any color combinations you like.  I love turquoise, black and white.  I also like fushia pink, black and white....or maybe even red, black and white.  Lime green, black and white is good too.  The possibilities are endless!!!!

I'm entering this card in the following challenges:
Twisted Tuesday Challenges  (Are You Blue?)
Wags & Whiskers  (Favorite Color Combinations)
The Paper Shelter  (Clean and Simple)
Fresh Brewed Challenge  (Rubber Stamp Only)

Thanks for stopping by and I hope y'all will give the triple time stamping technique a try!!!!  You'll have to leave me a comment and let me know how it works for you.

Have a great week!
Heidi