I have this really fun, part time job at Archiver's where everyone there is sooooo talented and I'm always learning new things. Since I love, love, love to learn different techniques and my Mother raised me to ALWAYS share with others, I thought what better way to share what I learn then to post it in a blog? While everything I share may not always incorporate a new technique, it will always incorporate my love of card making!
But first, you may wonder how I picked the name 'Smiley Guy Designs'? Well, besides the obvious fact that I'm basically a happy person and love a cute Smiley Face, I have this little stuffed character that my boyfriend gave me about 12-13 years ago. He's a Smiley Face with little legs so I named him 'Smiley Guy'. Now, Smiley Guy made the rounds and never stayed where I put him. Somedays I would open the dryer and he'd be in there with the laundry. Sometimes he would be inside the bag of dog food just sitting there staring at me. One day I even found him in the fridge. So when I think of things that make me happy....making cards is one thing but remembering how Smiley Guy makes me....well, smile...I just thought it would be an appropriate name for my blog.

So to get things started I'd like to share with you one of my recent Thanksgiving cards.
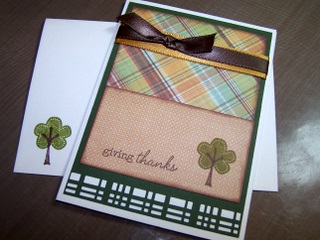
I used papers from We R Memory Keepers ‘Autumn Splendor’ collection to which I inked all edges to give them a little bit of depth. I love the muted fall colors. I stamped the two-part tree image using a stamp-a-ma-jig tool that helps you align your stamp perfectly. I stamped the tree trunk in brown and then was able to perfectly stamp the leaves around the trunk in green. It’s such a cool tool! The stamps are part of the ‘Trendy Trees’ stamp set from Stampin’ Up. The sentiment is from the ‘Vintage Picnic Sentiments' set from Papertrey Ink. The border punch at the bottom is from EK Success and is called ‘Plaid’. I layered a brown ribbon on top of a yellowish gold ribbon, adhered everything down and voila – a card is born! Oh, and of course you need a coordinating envelope to match!
Phew! Seems I've made it through my first post - I hope y'all enjoyed it! Thanks for reading!
Heidi
Phew! Seems I've made it through my first post - I hope y'all enjoyed it! Thanks for reading!
Heidi
Great job on starting your Blog, Heidi! I'll really enjoying checking in with you and seeing what you're up to. I'm trying to get a Blog set up for myself, too, but I'm so overwhelmed with the idea. Anyway, you KNOW I LOVE your work, and again, excellent first Posts! See you at work!
ReplyDeleteLove the new Posts, Heidi; all those cards are gorgeous! And that 4 Seasons card - I love it; I could add small pics of my kids from each season, and send it to the grandparents - they would eat it up!
ReplyDelete