May 26, 2013

Celebrate Baby - Lawn Fawn

Happy Sunday!  Hope everyone is enjoying their long holiday weekend.  I know I am!  And while you're hosting outdoor BBQ's and partaking in a few adult beverages, please take a moment to say thanks to the hardworking men and women who risk their lives everyday for us. 

This is my last card for the Lawn Fawn design team call which ends tomorrow.  I very rarely ever get to make baby cards so it was fun to actually make one.  The stamp sets used from Lawn Fawn are 'Plus One' and 'Say Cheese'.  The 'Say Cheese' one is really fun - it has an image of one of the old polaroid pictures - you remember those don't you????  So cute!!!

I decided to make what looks like three photos sprayed out.....it was so easy - you only really have to stamp and color a portion of the additional images since the body isn't really seen. After I stamped the clouds, I stamped them again on Eclipse masking paper, cut them out and placed them over the stamped images. I then used some Tim Holtz Distress Ink in Tumbled Glass and Bundled Sage to ground the carriage a little because it would suck to have it floating in space. The wheels on the baby carriage are little black Candi's from Craftwork Cards...they're like brads without the legs! 

That's all for today...thanks for stopping by and hope to see you again soon!

Heidi

May 24, 2013

A Waterfall Card - Lawn Fawn

Hello my friends.  Happy Friday to everyone!  Here in the US it's a long holiday weekend.   I'd like to offer a heartfelt thank you to all the men and women serving our country on this Memorial Day weekend.  'THANK YOU".

I have another card for the Lawn Fawn design team call and this is one of my favorite types of cards.  It's called a waterfall card and it was the first card I made that was accepted for publication in CardMaker Magazine way back in November of 2010. 

 
The stamp set is called 'Home Sweet Home' and it is so cute!  I colored the little vignettes with my COPIC markers and used white, pink and black cardstock I had on hand.  I created my own little patterned pink paper by stamping one of the little heart images from the stamp set all over the paper using Tim Holtz Distress Ink in "Tattered Rose" to create a tone-on-tone look.  Two gemstone brads and a scrap of sheer black dot ribbon finish off the card.
 
Here's what the card looks like when you pull the ribbon and the card starts to cascade (or waterfall)...
 
 
Hope you enjoy....thanks for stopping by and hope to see you again soon.
 
Happy Memorial Day,
Heidi

May 23, 2013

Blue Skies Ahead - Lawn Fawn

Hello my friends!  Today is Thursday and I think Mother Nature is a little confused.  Earlier this week it was sunny and 85,  This morning it was cloudy, drizzly, windy and 48 degrees.  I think someone needs to remind Mother Nature it's May and NOT November.  Yowza!

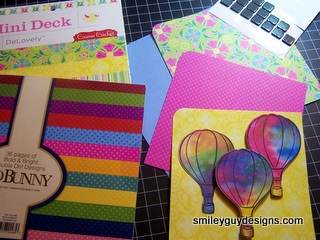
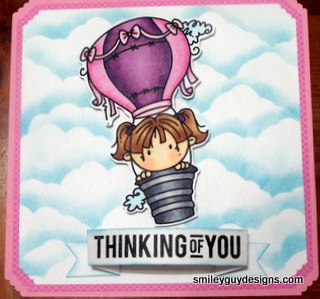
I have a picture tutorial for a card I'm submitting for Lawn Fawn's design team call.  This is one of their new stamp sets called 'Blue Skies' and you can buy the coordinating die cut set also.

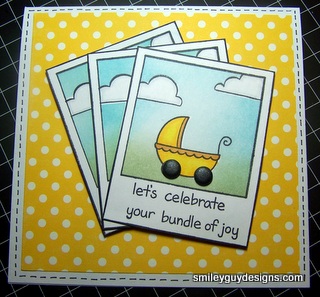
Here is a picture of the completed card.  It was so fun to make, a bit messy but it's not crafting if it's not messy, right?
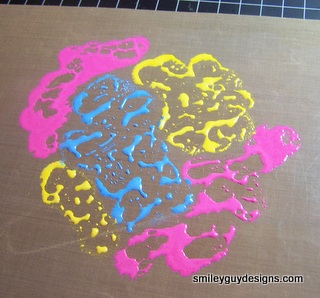
The first thing I did was to blob a bit of Tim Holtz Distress Paint onto my non-stick craft mat and spritz with water.
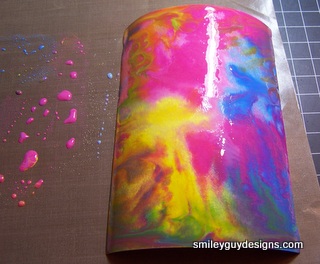
Then I took my cardstock and placed it down in the paint and sort of smooshed it around (and yes, that's an official cardmaking technical term).  Even though these are distressed inks, the ones I chose I pretty brightly colored.  You can let it air dry or do what I did and hit it with a heat gun.
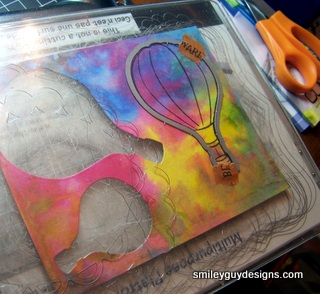
Once it was dry, I used black Staz-On ink and stamped the hot air balloons onto my painted cardstock.  I then took the matching die set and cut out the hot air balloons with my Big Shot die cut machine.  I used a little bit of washi tape to hold the die in place.
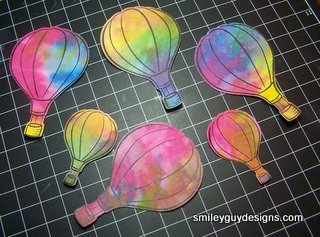
I had made a couple of the painted cardstock pieces and die cut more than a couple of hot air balloons so I could select the best ones. 

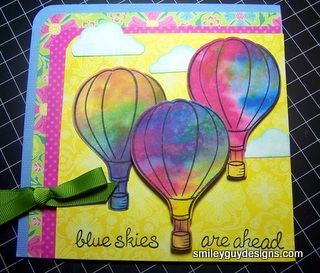
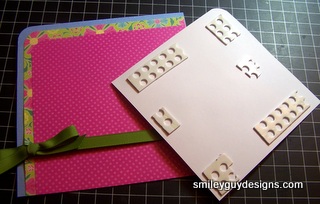
Then I went through all my 6x6 patterned paper pads to find just the right papers to use - that was no easy task since I have well over 45 paper pads (can you say paper addiction?).  I then decided which papers to use, which balloons to use and staggered them on the paper.  One is flat on the paper, one is popped using one layer of foam adhesive and the middle balloon is layered using two layers of foam adhesive.

I used a corner rounder and just rounded the upper left hand corner of all my papers and the card base and then offset all my layers.  I wrapped a green ribbon around the two bottom layers and attached to the card base.  I used one layer of foam adhesive to attach the balloon focal piece to the card base. As you can see I use all my foam adhesive sheets. I die cut a few clouds as well, used a sponge to add some ink around the edge and adhered them behind the balloons.


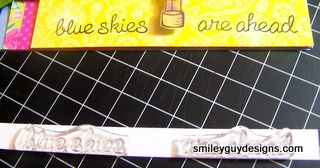
The last step was to stamp the sentiment on the front.  I used the sentiment 'Blue Skies are ahead' but since I wanted to use it at the bottom of the card, I needed to cut the stamp apart in order to use 'Blue Skies' on one side and 'are ahead' on the other side.  I couldn't stamp it as one piece because of the raised balloon basket in the middle.  I could have stamped the sentiment before attaching the balloons but to be honest, I wasn't sure what sentiment I wanted to use at that time. It's quite alright to cut your stamps apart....if you want to stamp it as one sentiment later, just place it on your acrylic block together.
Now that the sentiment is on there, the card is done.  I hope you enjoyed this tutorial and the card.  Thanks for stopping by and hope to see you again soon.
 
Heidi


May 19, 2013

Simple Congratulations - PSS Design Team Call

Hello my friends!  This is going to be a short post.....I have another entry for the Paper Smooches design team call - the deadline is Monday 5/20 and nothing like waiting until the last minute huh?

This card is a very simple 'Congratulations' card.  I love the little flower images (large, medium and small) from the stamp set 'Hubby and Wifey' and decided to create just a little chain of them across the front of a card.  The sentiment is from the stamp set simply called 'Salutations'.  See? in this case simple just fell into place.  The flowers were colored with Inktense colored pencils by Derwent and a little spot of white enamel by Ranger.  The little chain was colored in with a Stardust pen by Sakura of America.

 
Even the post is short and simple....see a pattern here?  Hope you enjoyed the card, thanks for stopping by and hope to see you again soon.
 
Thanks,
Heidi


May 18, 2013

Bulletin: I Love You - PSS Design Team Call

HAPPY 'SUNNY' SATURDAY my friends!  It's an absolutely gorgeous day in southeast WI.  I'm currently inside visiting with my Mom at the rehab center but pretty soon I'm getting her butt out of bed and we're going outside for a walk around the grounds.  Can you say 'fresh air'?

Today I'm posting another card entry for the Paper Smooches Sparks design team call.  It's funny where inspiration will strike...I was walking down the hall in my office on the way to the ladies room and I saw the bulletin board.  Now, this bulletin board has been there since way before I ever started working there....but for some reason I really took notice of it last week.  I had this brilliant (at least in my head it's brilliant) idea for a card.  The bulletin board in my office is round but I made my card bulletin board square.

I used a few different PS stamps sets to create the 'bulletins' on the board.  I used 'Hubby and Wifey', 'Fast Food' and 'Salutations'.  I also snuck in a Lawn Fawn (another favorite marketing name) stamp set 'Riley's ABC's' for the word 'bulletin'.   The patterned papers and cardstock used are from my scrap stash and I used a few different punches. 


Hope you enjoyed this card.  Thanks for stopping by and hope to see you again soon!

Heidi

May 15, 2013

Let's Do Lunch - Paper Smooches Sparks Challenge DT Call

Since I'm on a roll, I'm posting my second entry for the Paper Smooches Sparks challenge Design Team call tonight.  Then I have another design in my head for maybe another entry!

The stamp set I used on this card is called 'Think Fast' and it's pretty fun.  There's a big ole' sammich, an order of fries, a drink, pizza and some other images and sentiments.  It's really cute...but don't play with it if you haven't eaten because it will make you hungry.


The pizza slices are colored with COPIC markers and I cut the banners out of Bo Bunny Double Dot Neutral Necessities paper pad.  Did you know that to make perfect banners all you need to do is cut a slit up the center of the strip as far as you like, then make a cut from each of the corners to the top of the center cut...and voila your banner is even on both sides.  The circle disks are made using matching dot paper and an Epiphany Crafts shape studio to punch out the little epoxy shapes. 

COPIC markers:
Mushroom:  E81, E84
Pepper:  G14, G16
Pepperoni: E08, E19
Crust: E31
Sauce: R08
Shadow: W2

That's it for today....thanks for stopping by and I hope to see you again!

Heidi

Let's Hang Out - Paper Smooches Sparks DT Entry

Hello my friends!  It's been a while...here's an update on my Mom....we've had a quiet few weeks which has been fabulous.  She is doing well in rehab - in fact, she no longer needs speech therapy - she's off of pureed food and is now on what's called a mechanical soft food - which is real food but still soft (no steaks just yet).  She no longer needs thickened liquids which is so much easier for her.  She's still doing physical and occupational therapy and I have noticed a big difference in her ability to transfer from wheelchair to car and back, sitting on the edge of the bed, etc.  So, things are looking up and getting better each day.

The card I'm showing today is done as an entry for the Paper Smooches Sparks challenge Design Team call.  So far I have two entries so you'll have another post from me later tonight or tomorrow.  I love the stamps from Paper Smooches - most of the images are so whimsical and fun to use.  The stamp set I used for this card is called 'Hang Ups'.  The image was colored with my beloved COPIC markers (BTW - I'm going to be taking the Intermediate Certification Class at the end of June with one of my good friends Valerie - aka ValbyDesign.com).


The clouds were done using a template from Heather's Hobbie Haven.  I love her tutorials and she has a template on the left sidebar that you can print out of two sets of clouds.  Print the template, cut out the clouds and use a sponge or fingertip applicator, and voila - you have beautiful clouds.  Check out the template here.  I used Tim Holtz Distress Ink in 'Tumbled Glass'.  The ribbon is from my stash.

COPIC colors used:
Branches: E25, E27
Raccoon: E81, E84, E87
Leaves: YG63, YG67
Red Birds : R29, R39 
Blue Bird:  B24, B26

I hope you enjoyed todays card.  Thanks for stopping by and hope to see you again soon.

Heidi


May 5, 2013

"Balloons" Challenge for Sunshine Mail Foundation

Hello my friends!  Happy May to everyone....especially those areas that have gotten SNOW in the past couple of days.  I think Mother Nature must have fallen and hit her head...cuz she is obviously confused as to what season it should actually be.  LOL!  I'm just glad that for a change I'm NOT in the area that got snow.  I'll take rain and cool temps over snow any day.

We're way into the bi-weekly challenge for Sunshine Mail Foundation.  The theme for this challenge is 'Balloons' and the sponsor this time is Bugaboo.  The challenge ends on May 15th. 

Here's the card I made for the challenge as part of the Design Team.  This digital image is called "KIDZ Hot Air Balloon" and she was fun to color.  I used my favorite markers (COPICS) to color this image.  The fun thing about this card is the background - it's not actually cloud paper....I made the clouds using a template from Heather's Hobbie Haven.  I love her tutorials and she has a template on the left sidebar that you can print out of two sets of clouds.  Print the template, cut out the clouds and using a sponge or fingertip applicator, and voila - you have clouds.  Check out the template HERE. 


If you'd like to participate in the challenge, check out the Sunshine Mail Challenge Blog and link your card.

Sunshine Mail Foundation is a 501(c)3 nonprofit, provides children in need comfort, support and joy through free Sunshine Mail Care Packages.  Sunshine Mail is filled with handmade cards, a new stuffed animal and age appropriate items and delivered to children in need including hospitals, homeless shelters and foster care.  They are always looking for cards so if you're interested in brightening a child's day please send them to:

Sunshine Mail Foundation
2465 Centreville Road
#J17-767
Herndon, VA 20171

Thanks for stopping by and I hope to see you again soon.
Heidi